PROJECT DESCRIPTION
For this project, we were supposed to transform a live-action garage plate by integrating a fully designed CG environment. The process began in Nuke, where we had to camera track the footage, remove tracking markers from the walls, and rotoscope the opening to the back room to establish proper depth.
We then had to design and create a machine in Maya, which would occupy the back room, while also developing distinct atmospheres across both spaces. The scene was lit and rendered in Arnold with AOVs to allow for detailed control in compositing.
Finally, we had to integrate the renders back into the original footage in Nuke, using the AOVs to refine lighting and complete a final grade that blends the CG seamlessly with the live-action plate.
PROJECT GOALS
HARD SKILLS
- Improve camera tracking and matchmoving skills in Nuke
- Practice roto and paint techniques for clean plate creation and marker removal
- Learn to integrate CG into live-action footage with accurate scale, perspective, and depth
- Strengthen 3D modelling, look development, and lighting in Maya
- Learn how to export the scene and camera from Nuke to use them in other software
- Gain experience rendering with AOVs in Arnold Renderer
- Improve compositing and colour grading skills
- Practice texturing in Substance Painter
SOFT SKILLS
- Develop the ability to translate a concept into a cohesive visual outcome
- Improve problem-solving skills when dealing with imperfect footage or technical challenges
- Build a stronger sense of visual storytelling and atmosphere creation
- Enhance attention to detail, especially in matching CG with real footage
- Practice workflow organisation across multiple software and stages
- Strengthen time management when working through a full pipeline project
MOODBOARD
For my project, I decided to create a scene that would resemble an abandoned arcade. I wanted my main CG to be a claw machine, hence, I researched its mechanisms, potential designs and movements. I created an initial moodboard which helped me decide on the general atmosphere, colour palette and elements that I would include.
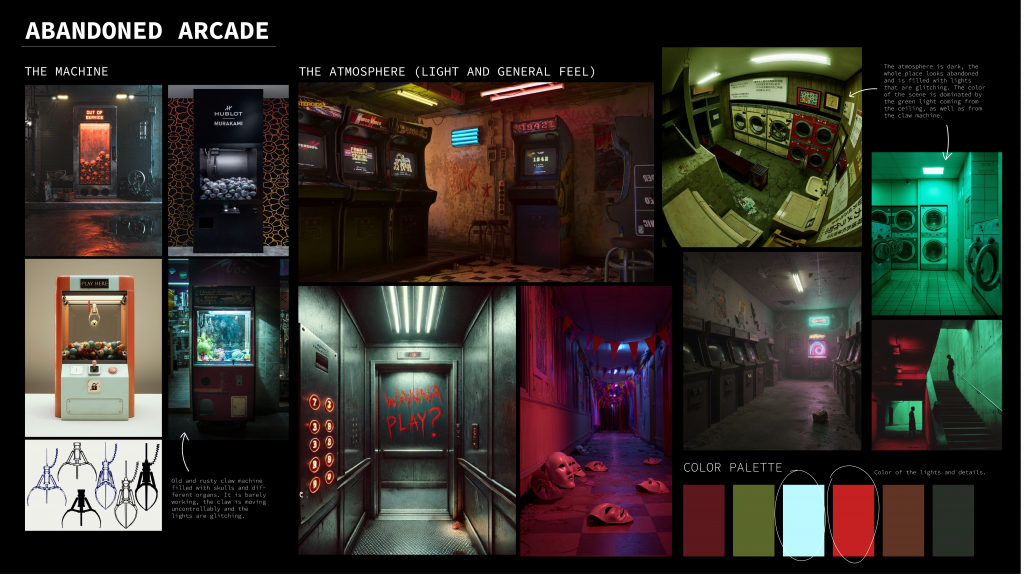
INITIAL IDEA / PHOTOSHOP BLOCK OUT
Before kicking off, I experimented a bit in Photoshop to have an idea of how I could arrange the scene and where I could potentially place my CG objects.
Week 1 – MATCHMOVING
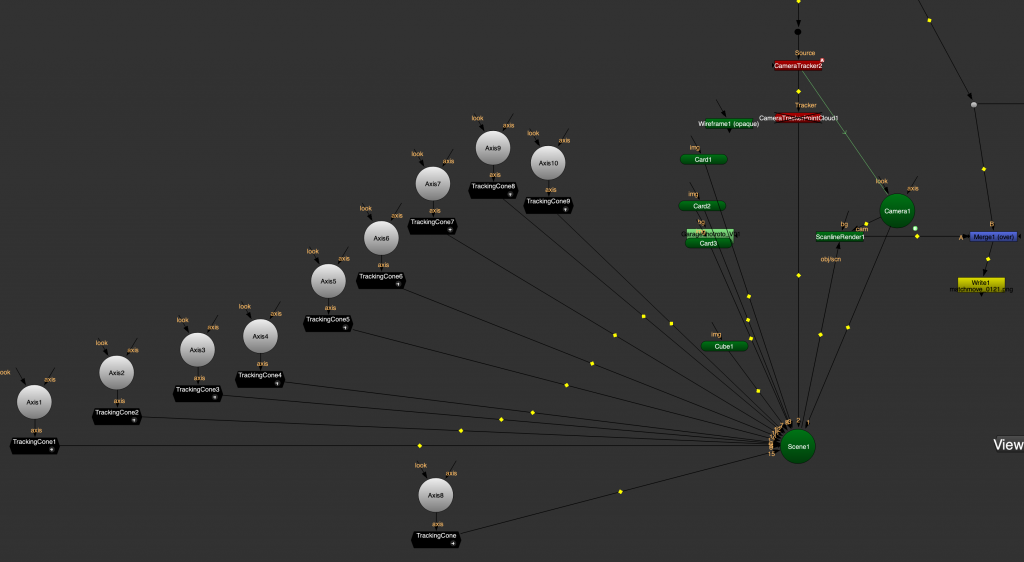
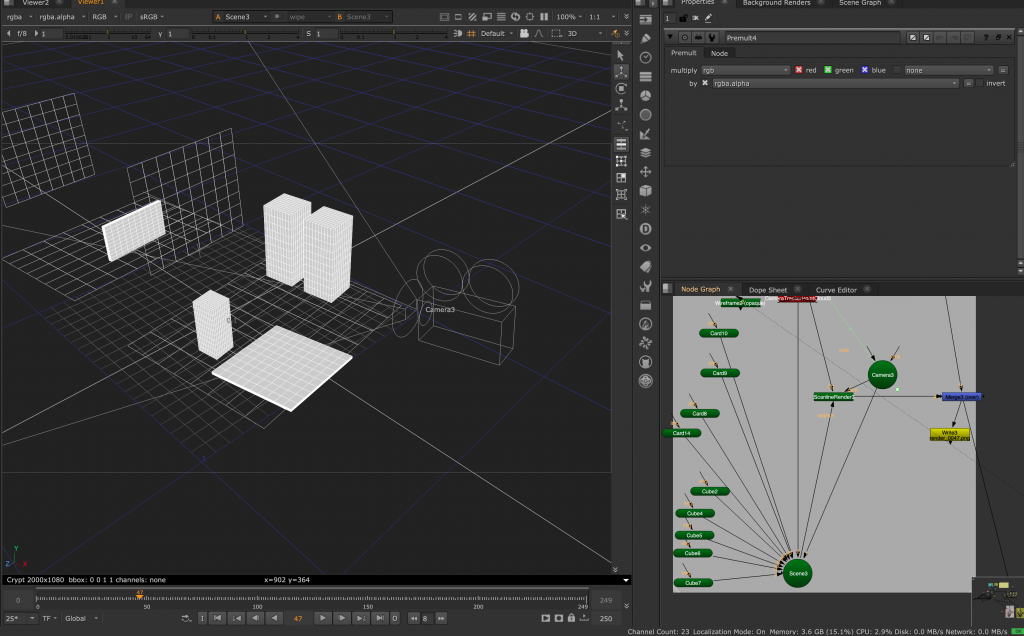
As our first Nuke task in this project, we had to analyse the garage footage to recreate the original camera movement in 3D space. This process is called matchmoving, which is done by tracking distinct points in the image over time and generating a camera that matches the motion, perspective, and lens characteristics of the real camera.
To represent key surfaces like walls and floors, I created projection cards and simple geometry like cubes and spheres. This helped to establish scale and spatial relationships, making it easier to, later on, place CG elements accurately within the scene.
Using tracking cones, I identified the location of markers within 3D space, which was helpful when I was removing them in the next step of this project.
Matchmoving allowed me to create a reliable 3D foundation so that the integrated CG appeared stable, grounded and consistent with the original shot.
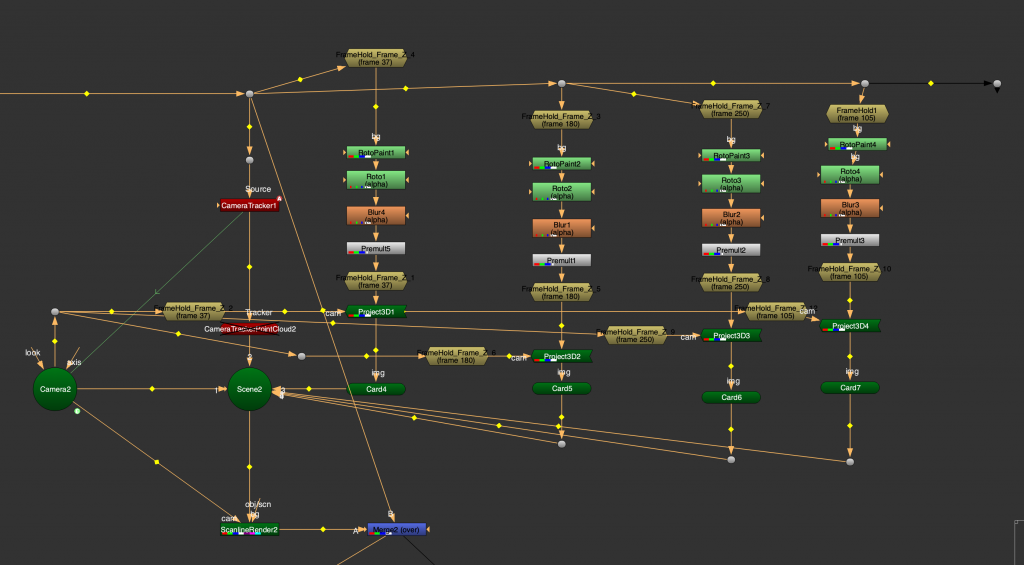
Week 2 – REMOVING MARKERS
Our next task was to remove the visible markers from the garage footage to create a seamless, usable plate for CG integration. Using the previously done camera track and 3D planar projections, I created clean patches using the roto paint technique, where I painted out the markers on one frame using the Frame Hold node. The goal was to ensure that all markers are removed in a way that is completely invisible to the viewer.
Week 3 – ROTOSCOPING
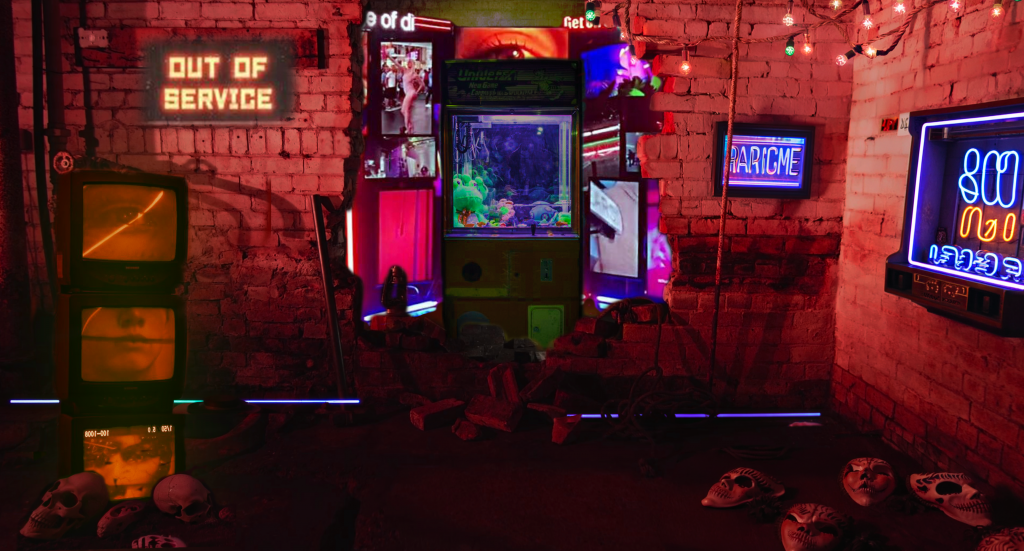
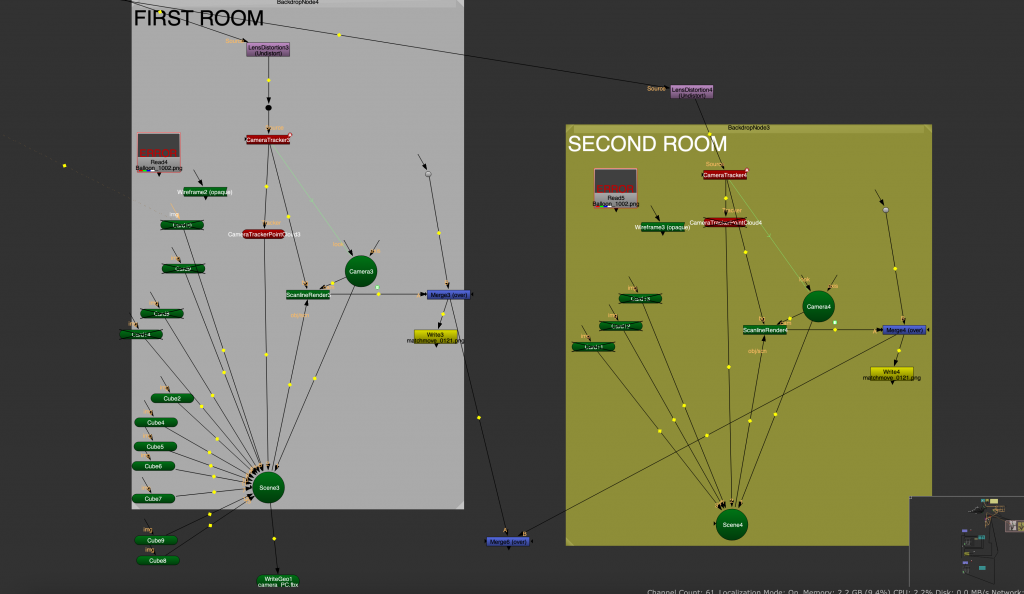
Because we were asked to put our machine in the second “room” of the garage, we had to rotoscope its opening so that it would look natural standing behind the lamp and deconstructed walls.
NUKE BLOCK OUT
I began designing my arcade by roughly blocking out the placement of CGI assets within the scene. To do this, I used the previously created projection cards that mapped the 2D footage into 3D space. These served as a spatial reference for the ground and walls, allowing me to position objects accurately so they would move consistently with the camera, avoiding any unwanted sliding or floating.
Once the layout was established, I exported the geometry along with the tracked camera and imported them into Maya.

ASSET CREATION AND ANIMATION IN MAYA
Once the blockout was established in Nuke and I had a clear direction for the machine design, I began remodeling an asset in Maya to better match my vision. I then added animation to elements such as the claw, buttons, lights, and eyeballs to give the machine a more natural and lifelike presence.
In addition, I modeled supporting elements for the front room of the garage, including arcade machines. These were designed to feel active and functional, enhanced by animated screen lights and subtle illumination.
All assets were positioned based on the initial blockout from Nuke. I also used the exported locators and camera data to ensure accurate placement and scale, allowing the geometry to align correctly with the scene and remain stable when composited back onto the original footage.
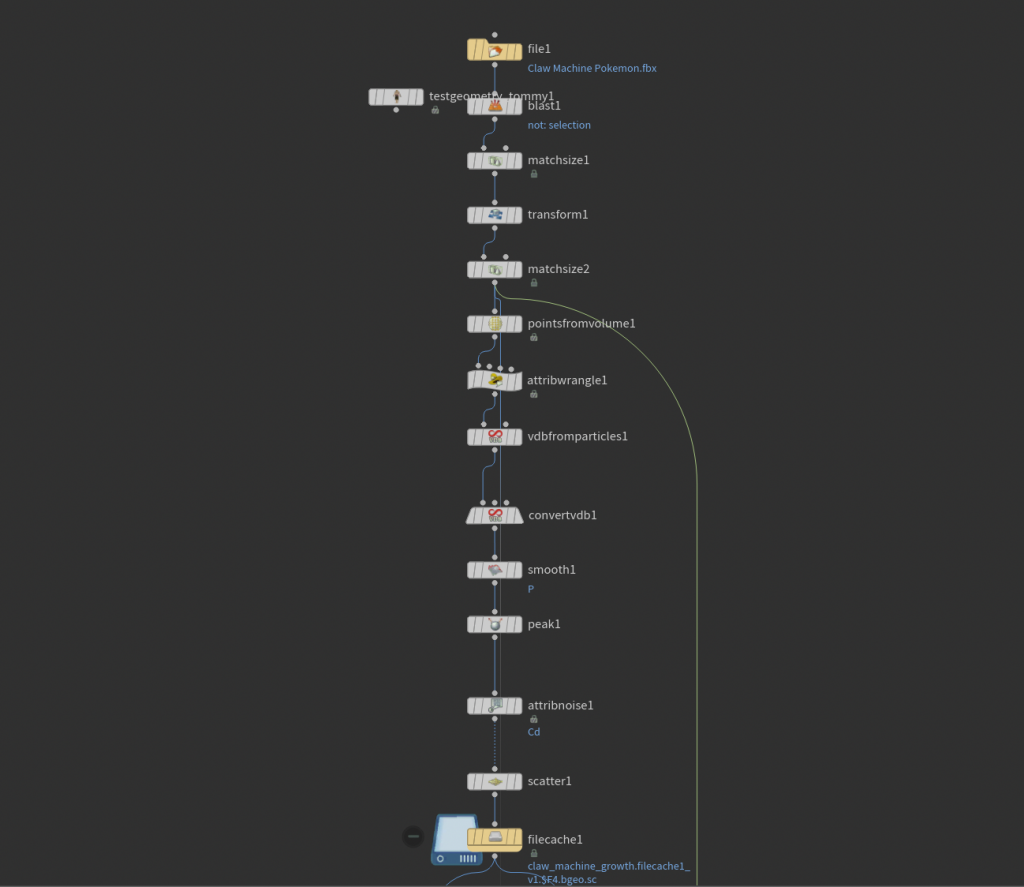
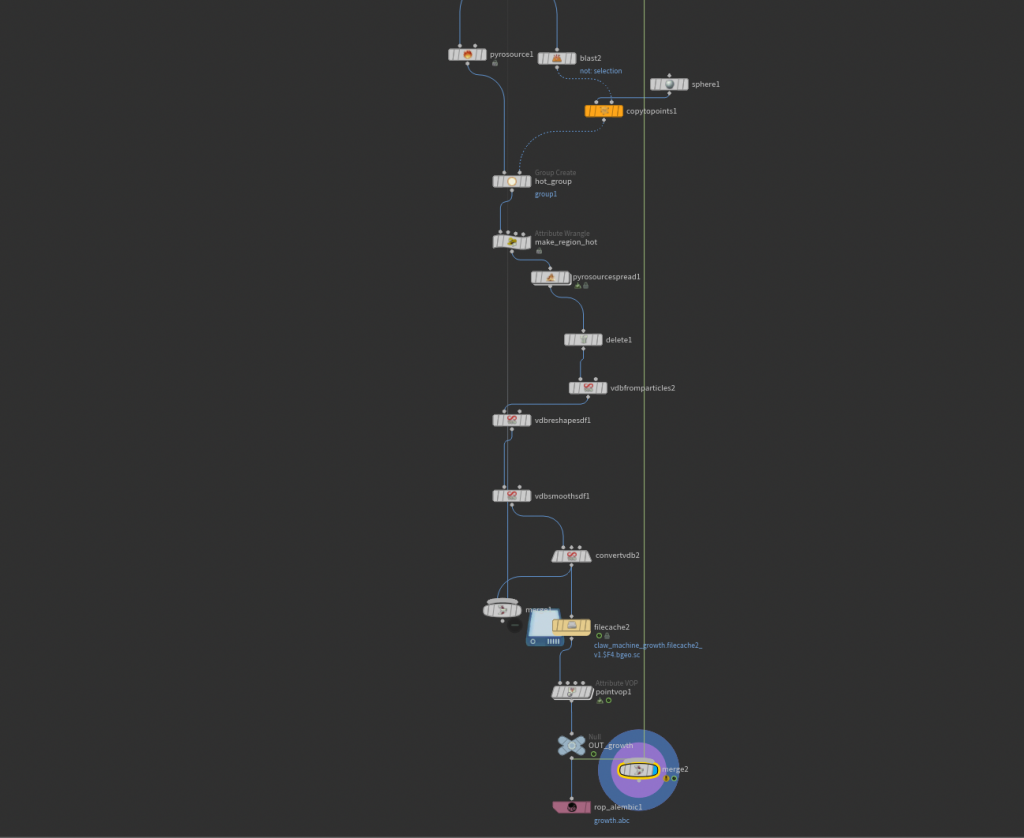
ADDING DETAILS – HOUDINI SIMULATION
To make the scene look more “alive”, I decided to use Houdini to simulate the abstract growth effect on certain objects. I created a slimy substance that spread across the main machine and a few other places, adding an interesting touch and depth.
I cached all simulations separately and exported them as Alembics, which I later imported to Maya and textured in the Arnold renderer.
RENDERING USING ARNOLD RENDERER
After importing the simulations into Maya, I began texturing each asset in Substance Painter. This was my first time using the software in a project, and it allowed me to explore a more detailed and efficient texturing workflow.
Once completed, I imported the texture maps into Maya and connected them to the corresponding materials. To match the lighting of the original footage, I used an HDRI that closely resembled the garage environment, which provided a strong base for the scene without the need for additional lighting.
After setting up the necessary AOVs in Arnold Renderer, I rendered the scene in two separate passes: one for the claw machine and elements in the second room, and another for the assets in the front room. This allowed for greater flexibility during compositing.
As this was my first time rendering with Arnold and working in Maya at this level, the process was both challenging and rewarding, and I was pleased with the final outcome.
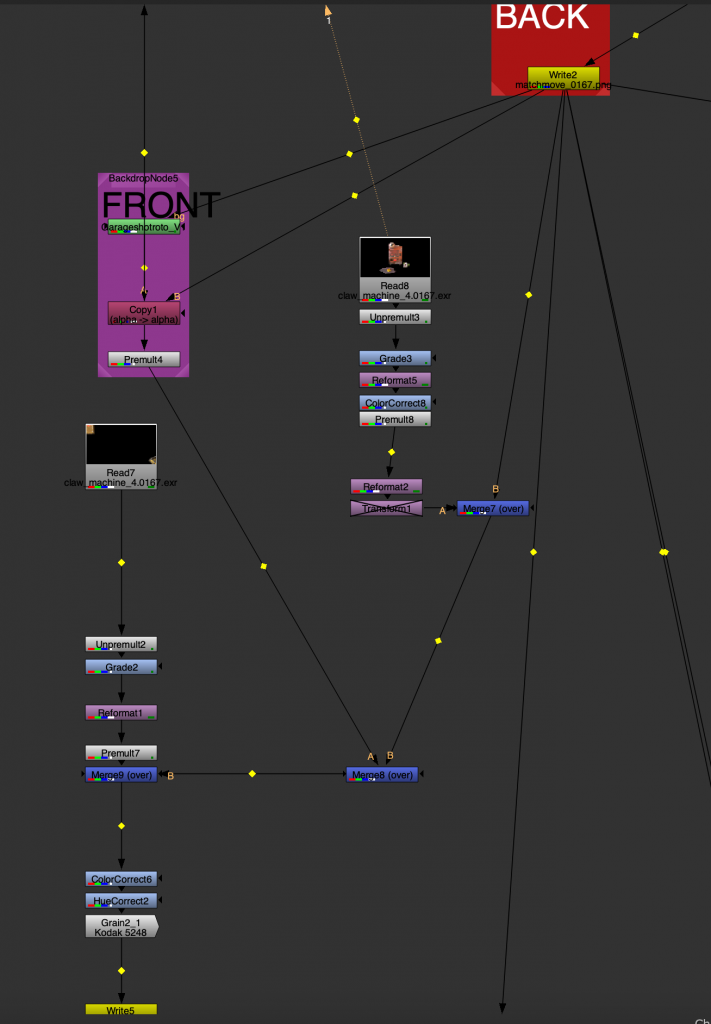
COMPOSITING IN NUKE
The last step was to composite everything in Nuke. I did some final color correction and grading to to match the garage environment.
FINAL OUTCOME
CREATIVE AND TECHNICAL HIGHLIGHTS
- Machine as a Focal Point
- Designing a central CG element that not only fills the space but also defines the narrative and visual identity of the scene.
- Blending Real and Imagined Worlds
- Transforming a mundane, real-life location into a more stylized and immersive environment while maintaining realism.
- Use of Light for Storytelling
- Guiding the viewer’s eye and shaping the mood through controlled lighting and contrast.
- Accurate Camera Tracking & Matchmove
- Reconstructing the original camera movement to enable precise CG integration.
- Clean Plate Creation
- Removing tracking markers and preparing the footage using roto and paint techniques.
- Rotoscoping
- Full CG Pipeline Execution
- Modeling, look development, lighting, and rendering in Maya with Arnold.
- CG Integration & Grading
- Matching color, grain, and lighting to blend CG elements naturally into the live-action plate.
LESSONS AND REFLECTIONS
- The importance of a strong foundation
I learned that clean camera tracking, accurate roto, and proper plate preparation are essential. Any issues at this stage quickly affect the final result, making later steps more difficult. - Attention to detail makes the integration believable
Small details like light direction, shadows, grain, and imperfections play a huge role in making CG feel part of the real footage. - Working with AOVs gives creative control
Rendering with multiple passes allowed for much more flexibility in compositing, especially when fine-tuning lighting and balancing the image. - Balancing technical work with creative decisions
The project required not only solving technical challenges but also making aesthetic choices about atmosphere, composition, and mood. - Planning and workflow are key
Managing different stages across software highlighted the importance of staying organized and thinking ahead. - Iteration improves the result
Testing, adjusting, and refining each stage was necessary to achieve a more cohesive and polished outcome. - Understanding the full pipeline
Going through the entire process helped build a clearer understanding of how each step connects and contributes to the final image.